Over $60 Million Worth of Bitcoins Hacked from NiceHash Exchange. Bitcoin mining platform and exchange NiceHash has been hacked, leaving investors short of close to $68 million in BTC.
As the price of Bitcoin continues to rocket, surging past the $14,500 mark at the time of writing, cyberattackers have once again begun hunting for a fresh target to cash in on in this lucrative industry.
Banks and financial institutions have long cautioned that the volatility of Bitcoin and other cryptocurrency makes it a risky investment, but for successful attackers, the industry potentially provides a quick method to get rich — much to the frustration of investors.
Unfortunately, it seems that one such criminal has gone down this path, compromising NiceHash servers and clearing the company out.
In a press release posted on Reddit, on Wednesday, NiceHash said that all operations will stop for the next 24 hours after their "payment system was compromised and the contents of the NiceHash Bitcoin wallet have been stolen."
NiceHash said it was working to "verify" the precise amount of BTC stolen, but according to a wallet which allegedly belongs to the attacker — traceable through the blockchain — 4,736.42 BTC was stolen, which at current pricing equates to $67,867,781.
"Clearly, this is a matter of deep concern and we are working hard to rectify the matter in the coming days," NiceHash says. "In addition to undertaking our own investigation, the incident has been reported to the relevant authorities and law enforcement and we are co-operating with them as a matter of urgency."
"We are fully committed to restoring the NiceHash service with the highest security measures at the earliest opportunity," the trading platform added.
The company has also asked users to change their online passwords as a precaution. NiceHash says the "full scope" of the incident is unknown.
"We are truly sorry for any inconvenience that this may have caused and are committing every resource towards solving this issue as soon as possible," the company added.
Inconvenience is an understatement — especially as so much was left in a single wallet — but the moment those coins shift, we may know more about the fate of the stolen investor funds.
About BruteSpray: BruteSpray takes nmap GNMAP/XML output or newline seperated JSONS and automatically brute-forces services with default credentials using Medusa. BruteSpray can even find non-standard ports by using the -sV inside Nmap.
BruteSpay's Installation
With Debian users, the only thing you need to do is this command: sudo apt install brutespray
For Arch Linux user, you must install Medusa first: sudo pacman -S medusa And then, enter these commands to install BruteSpray: Supported Services: ssh, ftp, telnet, vnc, mssql, mysql, postgresql, rsh, imap, nntpp, canywhere, pop3, rexec, rlogin, smbnt, smtp, svn, vmauthdv, snmp. How to use BruteSpray?
First do an Nmap scan with -oG nmap.gnmap or -oX nmap.xml. Command: python3 brutespray.py -h Command: python3 brutespray.py --file nmap.gnmap Command: python3 brutesrpay.py --file nmap.xml Command: python3 brutespray.py --file nmap.xml -i You can watch more details here:
Examples
Using Custom Wordlists: python3 brutespray.py --file nmap.gnmap -U /usr/share/wordlist/user.txt -P /usr/share/wordlist/pass.txt --threads 5 --hosts 5 Brute-Forcing Specific Services: python3 brutespray.py --file nmap.gnmap --service ftp,ssh,telnet --threads 5 --hosts 5 Specific Credentials: python3 brutespray.py --file nmap.gnmap -u admin -p password --threads 5 --hosts 5 Continue After Success: python3 brutespray.py --file nmap.gnmap --threads 5 --hosts 5 -c Use Nmap XML Output: python3 brutespray.py --file nmap.xml --threads 5 --hosts 5 Use JSON Output: python3 brutespray.py --file out.json --threads 5 --hosts 5 Interactive Mode:python3 brutespray.py --file nmap.xml -i Data Specs {"host":"127.0.0.1","port":"3306","service":"mysql"} {"host":"127.0.0.10","port":"3306","service":"mysql"} ... Changelog:Changelog notes are available at CHANGELOG.md.
Disclaimer: This tool is for educational use only, the author will not be held responsible for any misuse of this tool. This is my first project on github as such this project is far from perfect , I will listen to any criticism as long as it is constructive. Setup Guide: You will first need to register a bot with the Discord developper portal and then add the bot to the server that you want. Once the bot is created copy the token of your bot and paste it at line 11. Now on go on discord , go to the settings , go to appearance , scroll to the bottom , and activate "Developer Mode",now go to the server where your bot added right click on the channel where you want the bot to post , click copy ID and finally , paste the ID in the parenthesis in line 99. Install requirements ("pip3 install -r requirements.txt") Then if steps above were succesful after launching the python file, or executable , it will post a message on the server with a generated uuid , all that is left to do is posting "!interact " with the given uuid. Now your bot should be available to use ! Requirements: Python3,Windows Compiling to exe (optional): If you want to compile the bot to exe you can use PyInstaller. Inside the directory of the bot execute "PyInstaller --onefile --noconsole DiscordRAT.py" or "python3 -m PyInstaller --onefile --noconsole DiscordRAT(NoCV).py (or DiscordRAT.py)" If an error occured during compiling try to import the discord module "PyInstaller --onefile --noconsole --hidden-import=discord DiscordRAT.py" Advice: If you have problems with the installation of win32api or other modules , try installing it in a python virtual environment. There are two python files one has opencv and webcam related modules the other does not, this has been done because open-cv adds multiple dozens of megabytes to the compiled .exe file.
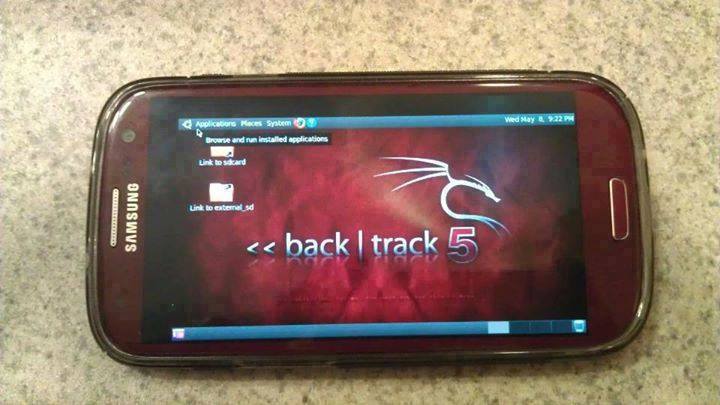
Guide you step by step to How to install and run Backtrack on android. As the Backtrack is also available with ARM architecture which makes it possible to run Backtrack on an ARM machine such as mobiles or tablets.
Recently, We are discussed Install and Run BackTrack on Windows. Android is the best OS for penetration testing. It designed for digital forensics and penetration testing or hacking tool. It comes with many more updated tools. As the Backtrack is also available with ARM architecture which makes it possible to run Backtrack on an ARM machine such as mobiles or tablets.
How To Install and Run Backtrack On AndroidRequirements
A Rooted Device [ Root Simple Android Phone Without Pc ]
If you are using PC then you need 7zip for extraction otherwise you can use zarchiver on your android phone. [ Download ]
Step to Install and Run Backtrack On Android:
First of all extract the BT5-GNOME-ARM.7z. and copy the "BT5" folder and then put in your phone's root directory. Here mine phone is /sdcard. The root directory is different for different mobile devices.
Now install all the above apps Busybox, Android Terminal, Android Vnc.
After installing BusyBox application open it and wait until it finishes loading and then click on Smart install.
Now open the android terminal and type the following command: sucd /sdcard/BT5sh bootbtNOTE :- When you type su in terminal it will ask you for superuser request and you have to tap on Grant.
After this, type the following commands in terminal. export USER=rootvncpasswd
After entering vncpasswd the terminal will ask you to enter the password. Enter the desired password and hit enter.
Now type the following commands. tightvncserver -geometry 1280×720
The terminal emulator will create the localhost to connect it to VNC server. Now note the localhost port marked red below. Now minimize the terminal emulator.
Open the Android VNC and type the following settings.
Nickname : BT5 Password : your password here which you entered in terminal (step no.6) Address : localhost Port : 5906
NOTE: Make sure that your localhost's port matches with terminal's localhost. Here mine New 'X' desktop is localhost:6. You may be different. So, in VNC type Port 590X where the "X" is the localhost in the android terminal.
That's it now just tap on connect to run the Backtrack on your android. So in this way you successfully install and run backtrack 5 on android. If you face any problem feel free to discuss in below comments!
In this article we are going to go through File Inclusion Vulnerability. Wikipedia defines File Inclusion Vulnerability as: "A file inclusion vulnerability is a type of web vulnerability that is most commonly found to affect web applications that rely on a scripting run time. This issue is caused when an application builds a path to executable code using an attacker-controlled variable in a way that allows the attacker to control which file is executed at run time. A file include vulnerability is distinct from a generic directory traversal attack, in that directory traversal is a way of gaining unauthorized file system access, and a file inclusion vulnerability subverts how an application loads code for execution. Successful exploitation of a file inclusion vulnerability will result in remote code execution on the web server that runs the affected web application." There are two types of File Inclusion Vulnerabilities, LFI (Local File Inclusion) and RFI (Remote File Inclusion). Offensive Security's Metasploit Unleashed guide describes LFI and RFI as: "LFI vulnerabilities allow an attacker to read (and sometimes execute) files on the victim machine. This can be very dangerous because if the web server is misconfigured and running with high privileges, the attacker may gain access to sensitive information. If the attacker is able to place code on the web server through other means, then they may be able to execute arbitrary commands. RFI vulnerabilities are easier to exploit but less common. Instead of accessing a file on the local machine, the attacker is able to execute code hosted on their own machine." In simpler terms LFI allows us to use the web application's execution engine (say php) to execute local files on the web server and RFI allows us to execute remote files, within the context of the target web server, which can be hosted anywhere remotely (given they can be accessed from the network on which web server is running). To follow along, click on the File Inclusion navigation link of DVWA, you should see a page like this:
Lets start by doing an LFI attack on the web application. Looking at the URL of the web application we can see a parameter named page which is used to load different php pages on the website.
Since it is loading different pages we can guess that it is loading local pages from the server and executing them. Lets try to get the famous /etc/passwd file found on every linux, to do that we have to find a way to access it via our LFI. We will start with this:
../etc/passwd
entering the above payload in the page parameter of the URL:
we get nothing back which means the page does not exist. Lets try to understand what we are trying to accomplish. We are asking for a file named passwd in a directory named etc which is one directory up from our current working directory. The etc directory lies at the root (/) of a linux file system. We tried to guess that we are in a directory (say www) which also lies at the root of the file system, that's why we tried to go up by one directory and then move to the etc directory which contains the passwd file. Our next guess will be that maybe we are two directories deeper, so we modify our payload to be like this:
../../etc/passwd
we get nothing back. We continue to modify our payload thinking we are one more directory deeper.
../../../etc/passwd
no luck again, lets try one more:
../../../../etc/passwd
nop nothing, we keep on going one directory deeper until we get seven directories deep and our payload becomes:
../../../../../../../etc/passwd
which returns the contents of passwd file as seen below:
This just means that we are currently working in a directory which is seven levels deep inside the root (/) directory. It also proves that our LFI is a success. We can also use php filters to get more and more information from the server. For example if we want to get the source code of the web server we can use php wrapper filter for that like this:
We will get a base64 encoded string. Lets copy that base64 encoded string in a file and save it as index.php.b64 (name can be anything) and then decode it like this:
cat index.php.b64 | base64 -d > index.php
We will now be able to read the web application's source code. But you maybe thinking why didn't we simply try to get index.php file without using php filter. The reason is because if we try to get a php file with LFI, the php file will be executed by the php interpreter rather than displayed as a text file. As a workaround we first encode it as base64 which the interpreter won't interpret since it is not php and thus will display the text. Next we will try to get a shell. Before php version 5.2, allow_url_include setting was enabled by default however after version 5.2 it was disabled by default. Since the version of php on which our dvwa app is running on is 5.2+ we cannot use the older methods like input wrapper or RFI to get shell on dvwa unless we change the default settings (which I won't). We will use the file upload functionality to get shell. We will upload a reverse shell using the file upload functionality and then access that uploaded reverse shell via LFI. Lets upload our reverse shell via File Upload functionality and then set up our netcat listener to listen for a connection coming from the server.
nc -lvnp 9999
Then using our LFI we will execute the uploaded reverse shell by accessing it using this url:
To learn more about File Upload Vulnerability and the reverse shell we have used here read Learning Web Pentesting With DVWA Part 5: Using File Upload to Get Shell. Attackers usually chain multiple vulnerabilities to get as much access as they can. This is a simple example of how multiple vulnerabilities (Unrestricted File Upload + LFI) can be used to scale up attacks. If you are interested in learning more about php wrappers then LFI CheetSheet is a good read and if you want to perform these attacks on the dvwa, then you'll have to enable allow_url_include setting by logging in to the dvwa server. That's it for today have fun. Leave your questions and queries in the comments below.
Kali Linux has been the most advanced penetration testing machine introduced yet. It has the most valuable tools used for every sort of hacking. To take advantage of Kali Linux hacking tools, you have to switch your OS to Kali Linux. You can either install Kali Linux as your default OS or just install as a virtual machine within the same OS. You can learn more about how to install Kali Linux Virtualbox. Today in this tutorial, I am just going to share a very simple Kali Linux tutorial on how to capture screenshot in Kali Linux. It's very simple and newbie friendly.
SO, HOW TO CAPTURE SCREENSHOT IN KALI LINUX? – KALI LINUX TUTORIAL
There are two ways to capture a screenshot in Kali Linux. One is the ultimate easy one and the second one is a bit complex but it's also not so complicated. So, don't worry about anything.
INSTRUCTIONS TO FOLLOW
In a first way, you can take a screenshot in a similar way as you take in Windows OS by simply clicking the PrntScr button on the keyboard. As you hit that button, a screenshot will be saved in the Pictures folder of your Kali Linux. The major problem with it, it only captures the full screen. We have no control over it to capture a specific window or region.
The second way is to take a screenshot using the command. For that, open up a terminal in the Kali Linux and type apt-get install ImageMagick.
Once the command is completed and ImageMagick is installed. We have two options to take a screenshot with it. One is to capture full screen and second is to capture a specific window.
To capture full screen, type import -window root Pictures/AnyNameOfTheImage.png in the terminal. It will take a full screenshot and will save it to the Pictures directory by the name you specify. Make sure to type .png at the end of the file name.
To take a screenshot of a specific window or region, type import Pictures/AnyNameOfTheImage.png in the terminal and hit Enter, it will turn the cursor to a selection tool. You just click the mouse button and select the area you want to capture. As you will leave the mouse key, screenshot will be saved in the Pictures folder.
That's all how you can capture screenshot in Kali Linux. This is a very simple and beginner-friendly Kali Linux tutorial to help out all the newbies how they can use this features in need. Hope it will be useful for you.
Decompiling is very useful for understanding srtipped binaries, most dissasemblers like IDA or Hopper have a plugin for decompiling binaries, generating a c like pseudocode.
Static analysis, is very useful in most of cases, specially when the binary is not so big, or when you just have an address where to start to analyze. But some algorithms will be learned in less time by dynamic analysis like tracing or debugging.
In cookiemonsters team, we are working on several tracers with different focus, but all of them mix the concept of tracing and decompiling to generate human-readable traces.
S2 is my tracer & decompiler plugin for gdb, very useful for ctfs.
Some of the features are:
- signed/unsigned detecion - conditional pseudocode (if) - syscall resolution - unroll bucles - used registers values - mem states - strings - logging
Welcome to my another PHP and MYSQL tutorial. In the previous I've discussed about the data insertion into database by using PHP and MYSQL. So i did successfully in the previous video.
In this video tutorial I'll discuss How to fetch data from the database called as data fetching. It's really a simple thing to access your data which is in database. You just have to do a little work for this. For fetching data you have follow some steps.
How to Fetch Data from Database
Step 1:
Make a connection with your database which i did in the previous blog.
Step 2:
If you wanna fetching a values in "form" or in a table so just have to create a form, table or whatever you want in HTML. I've created a table where I'll show you how to fetch data in table form.
Step 3:
Write a query SELECT * FROM table_Name;
Step 4:
Create a Loop for fetching all the data on a single click.
Step 5:
Create variables for the sake of storing a different values from the combined values in the loop variable like:
//while loop to fetch all the values from the database and stored in the variable named "row".
Bob was tasked to break into XYZcorporation, so he pulled up the facility on google maps to see what the layout was. He was looking for any possible entry paths into the company headquarters. Online maps showed that the whole facility was surrounded by a security access gate. Not much else could be determined remotely so bob decided to take a drive to the facility and get a closer look.
Bob parked down the street in view of the entry gate. Upon arrival he noted the gate was un-manned and cars were rolling up to the gate typing in an access code or simply driving up to the gate as it opening automatically.Interestingly there was some kind of wireless technology in use.
How do we go from watching a car go through a gate, to having a physical device that opens the gate?
We will take a look at reversing a signal from an actual gate to program a remote with the proper RF signal.Learning how to perform these steps manually to get a better understanding of how RF remotes work in conjunction with automating processes with RFCrack.
In the the previous blogs, we sniffed signals and replayed them to perform actions. In this blog we are going to take a look at a signal and reverse it to create a physical device that will act as a replacement for the original device. Depending on the scenario this may be a better approach if you plan to enter the facility off hours when there is no signal to capture or you don't want to look suspicious.
Recon:
Lets first use the scanning functionality in RFCrack to find known frequencies. Weneed to understand the frequencies that gates usually use. This way we can set our scanner to a limited number of frequencies to rotate through. The smaller rage of frequencies used will provide a better chance of capturing a signal when a car opens the target gate. This would be beneficial if the scanning device is left unattended within a dropbox created with something like a Kali on a Raspberry Pi. One could access it from a good distance away by setting up a wifi hotspot or cellular connection.
Based on research remotes tend to use 315Mhz, 390Mhz, 433Mhz and a few other frequencies. So in our case we will start up RFCrack on those likely used frequencies and just let it run. We can also look up the FCID of our clicker to see what Frequencies manufactures are using. Although not standardized, similar technologies tend to use similar configurations. Below is from the data sheet located at https://fccid.io/HBW7922/Test-Report/test-report-1755584 which indicates that if this gate is compatible with a universal remote it should be using the 300,310, 315, 372, 390 Frequencies. Most notably the 310, 315 and 390 as the others are only on a couple configurations.
RFCrack Scanning:
Since the most used ranges are 310, 315, 390 within our universal clicker, lets set RFCrack scanner to rotate through those and scan for signals.If a number of cars go through the gate and there are no captures we can adjust the scanner later over our wifi connection from a distance.
Currently Scanning: 433000000 To cancel hit enter and wait a few seconds
Example of logging output:
From the above output you will see that a frequency was found on 390. However, if you had left this running for a few hours you could easily see all of the output in the log file located in your RFCrack/scanning_logs directory.For example the following captures were found in the log file in an easily parseable format:
Analyzing the signal to determine toggle switches:
Ok sweet, now we have a valid signal which will open the gate. Of course we could just replay this and open the gate, but we are going to create a physical device we can pass along to whoever needs entry regardless if they understand RF. No need to fumble around with a computer and look suspicious.Also replaying a signal with RFCrack is just to easy, nothing new to learn taking the easy route.
The first thing we are going to do is graph the capture and take a look at the wave pattern it creates. This can give us a lot of clues that might prove beneficial in figuring out the toggle switch pattern found in remotes. There are a few ways we can do this. If you don't have a yardstick at home you can capture the initial signal with your cheap RTL-SDR dongle as we did in the first RF blog. We could then open it in audacity. This signal is shown below.
Let RFCrack Plot the Signal For you:
The other option is let RFCrack help you out by taking a signal from the log output above and let RFCrack plot it for you.This saves time and allows you to use only one piece of hardware for all of the work.This can easily be done with the following command:
From the graph output we see 2 distinct crest lengths and some junk at either end we can throw away. These 2 unique crests correspond to our toggle switch positions of up/down giving us the following 2 possible scenarios using a 9 toggle switch remote based on the 9 crests above:
Possible toggle switch scenarios:
down down up up up down down down down
up up down down down up up up up
Configuring a remote:
Proper toggle switch configuration allows us to program a universal remote that sends a signal to the gate. However even with the proper toggle switch configuration the remote has many different signals it sends based on the manufacturer or type of signal.In order to figure out which configuration the gate is using without physically watching the gate open, we will rely on local signal analysis/comparison.
Programming a remote is done by clicking the device with the proper toggle switch configuration until the gate opens and the correct manufacturer is configured. Since we don't have access to the gate after capturing the initial signal we will instead compare each signal from he remote to the original captured signal.
Comparing Signals:
This can be done a few ways, one way is to use an RTLSDR and capture all of the presses followed by visually comparing the output in audacity. Instead I prefer to use one tool and automate this process with RFCrack so that on each click of the device we can compare a signal with the original capture. Since there are multiple signals sent with each click it will analyze all of them and provide a percent likelihood of match of all the signals in that click followed by a comparing the highest % match graph for visual confirmation. If you are seeing a 80-90% match you should have the correct signal match.
Note:Not every click will show output as some clicks will be on different frequencies, these don't matter since our recon confirmed the gate is communicating on 390Mhz.
In order to analyze the signals in real time you will need to open up your clicker and set the proper toggle switch settings followed by setting up a sniffer and live analysis with RFCrack:
Open up 2 terminals and use the following commands:
#Setup a sniffer on 390mhz Setup sniffer:python RFCrack.py -k -c -f 390000000.
#Monitor the log file, and provide the gates original signal Setup Analysis: python RFCrack.py -c -u 1f0fffe0fffc01ff803ff007fe0fffc1fff83fff07ffe0007c -n.
Cmd switches used
-k = known frequency
-c = compare mode
-f = frequency
-n = no yardstick needed for analysis
Make sure your remote is configured for one of the possible toggle configurations determined above. In the below example I am using the first configuration, any extra toggles left in the down position: (down down up up up down down down down)
Analyze Your Clicks:
Now with the two terminals open and running click the reset switch to the bottom left and hold till it flashes. Then keep clicking the left button and viewing the output in the sniffing analysis terminal which will provide the comparisons as graphs are loaded to validate the output.If you click the device and no output is seen, all that means is that the device is communicating on a frequency which we are not listening on.We don't care about those signals since they don't pertain to our target.
At around the 11th click you will see high likelihood of a match and a graph which is near identical. A few click outputs are shown below with the graph from the last output with a 97% match.It will always graph the highest percentage within a click.Sometimes there will be blank graphs when the data is wacky and doesn't work so well. This is fine since we don't care about wacky data.
You will notice the previous clicks did not show even close to a match, so its pretty easy to determine which is the right manufacture and setup for your target gate. Now just click the right hand button on the remote and it should be configured with the gates setup even though you are in another location setting up for your test.
For Visual of the last signal comparison go to ./imageOutput/LiveComparison.png
----------Start Signals In Press--------------
Percent Chance of Match for press is: 0.05
Percent Chance of Match for press is: 0.14
Percent Chance of Match for press is: 0.14
Percent Chance of Match for press is: 0.12
----------End Signals In Press------------
For Visual of the last signal comparison go to ./imageOutput/LiveComparison.png
----------Start Signals In Press--------------
Percent Chance of Match for press is: 0.14
Percent Chance of Match for press is: 0.20
Percent Chance of Match for press is: 0.19
Percent Chance of Match for press is: 0.25
----------End Signals In Press------------
For Visual of the last signal comparison go to ./imageOutput/LiveComparison.png
----------Start Signals In Press--------------
Percent Chance of Match for press is: 0.93
Percent Chance of Match for press is: 0.93
Percent Chance of Match for press is: 0.97
Percent Chance of Match for press is: 0.90
Percent Chance of Match for press is: 0.88
Percent Chance of Match for press is: 0.44
----------End Signals In Press------------
For Visual of the last signal comparison go to ./imageOutput/LiveComparison.png
Graph Comparison Output for 97% Match:
Conclusion:
You have now walked through successfully reversing a toggle switch remote for a security gate. You took a raw signal and created a working device using only a Yardstick and RFCrack.This was just a quick tutorial on leveraging the skillsets you gained in previous blogs in order to learn how to analyzeRF signals within embedded devices. There are many scenarios these same techniques could assist in.We also covered a few new features in RF crack regarding logging, graphing and comparing signals.These are just a few of the features which have been added since the initial release. For more info and other features check the wiki.
Quando os meus olhos te tocaram Eu senti que encontrara A outra, metade de mim Tive medo de acordar Como se vivesse um sonho Que não pensei em realizar E a força do desejo Faz me chegar perto de ti Quando eu te falei em amor Tu sorriste para mim E o mundo ficou bem melhor Quando eu te falei em amor Nos sentimos os dois Que o amanha vem depois E não no fim Estas linhas que hoje escrevo São do livro da memória Do que eu sinto por ti E tudo o que tu me das É parte da história que eu ainda não vivi E a força do desejo Faz me chegar de ti Quando eu te falei em amor Tu sorriste para mim E o mundo ficou bem melhor Quando eu te falei em amor Nos sentimos os dois Que o amanha vem depois e não no fim André Sardet
Collide
The dawn is breaking A light shining through You're barely waking And I'm tangled up in you Yeah But I'm open, you're closed Where I follow, you'll go I worry I won't see your face Light up again Even the best fall down sometimes Even the wrong words seem to rhyme Out of the doubt that fills my mind I somehow find, you and I collide I'm quiet, you know You make a first impression I've found I'm scared to know I'm always on your mind Even the best fall down sometimes Even the stars refuse to shine Out of the back you fall in time I somehow find, you and I collide Don't stop here I've lost my place I'm close behind Even the best fall down sometimes Even the wrong words seem to rhyme Out of the doubt that fills your mind You finally find, you and I collide You finally find You and I collide You finally findYou and I collide
Howie Day
Everything
You're a falling star, You're the get away car. You're the line in the sand when I go too far. You're the swimming pool, on an August day. And You're the perfect thing to see. And you play it coy, but it's kinda cute. Ah, When you smile at me you know exactly what you do. Baby don't pretend, that you don't know it's true. Cause you can see it when I look at you. And in this crazy life, and through these crazy times It's you, it's you, You make me sing. You're every line, you're every word, you're everything. You're a carousel, you're a wishing well, And you light me up, when you ring my bell. You're a mystery, you're from outer space, You're every minute of my everyday. And I can't believe, uh that I'm your man, And I get to kiss you baby just because I can. Whatever comes our way, ah we'll see it through, And you know that's what our love can do. And in this crazy life, and through these crazy times It's you, it's you, You make me sing You're every line, you're every word, you're everything. So, La, La, La, La, La, La, La So, La, La, La, La, La, La, La And in this crazy life, and through these crazy times It's you, it's you, You make me sing. You're every line, you're every word, you're everything. You're every song, and I sing along. Cause you're my everything. yeah, yeah So, La, La, La, La, La, La, La So, La, La, La, La, La, La, La Michael Bublé